
How to Trim a Window for Insulated Vinyl Siding

In this article we’ll explain the three major steps to trim out a window for insulated vinyl siding. These are our recommendations for the best finished appearance, although there are many methods to install trim around a window.
Trimming out windows and doors is one of the most important steps when installing new siding on a home. A well done trim installation can set up the rest of the project for success, and dramatically improve the overall appearance of the home.
Installing insulated vinyl siding is very similar to installing traditional vinyl siding. The additional thickness of the insulation adhered to the siding does require some additional steps when trimming out windows, doors, and other openings. Read more about vinyl siding vs. insulated vinyl siding here.
We highly suggest watching the video below, which supplements the written instructions.
Trimming a Window for Insulated Vinyl Siding: Tools and Materials
- Aluminum coil
- Aluminum break
- Snips
- Speed Square
- Hammer
- Nails
- Carpenters pencil
Step 1: Select Your J-Channel
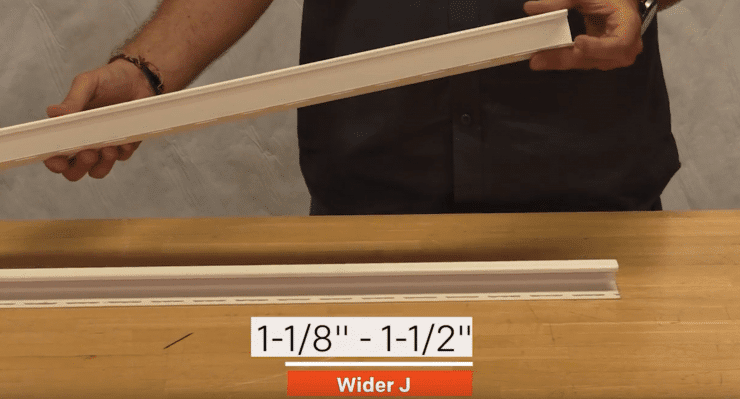
When installing traditional vinyl siding, the standard j-channel ranges from ⅝” to ⅞” wide. When installing insulated vinyl siding, you must use a wider j-channel, ranging from 1-⅛” to 1-½” wide, made specifically for receiving the additional thickness of the insulation.
If you are installing a product like FullbackV, where the contoured insulation is separate from the vinyl panel, you can use a standard j-channel with some simple modifications, which we will outline later in this article. (Butt the Fullback insulation against the foam shim, then slide the siding over top, into the pocket of the j-channel. Using a foam shim maintains continuous insulation.)
Once you have your j-channel selected, push it against the edge of the window. If the channel sticks out past the widow, you will want to install a wood frame made of 2x4s around the window to build it out. Begin by installing housewrap and a drip cap at the top of the window. Frame the window with 2x4s, tapering the bottom edge to ensure any collected water can drain away from the window.
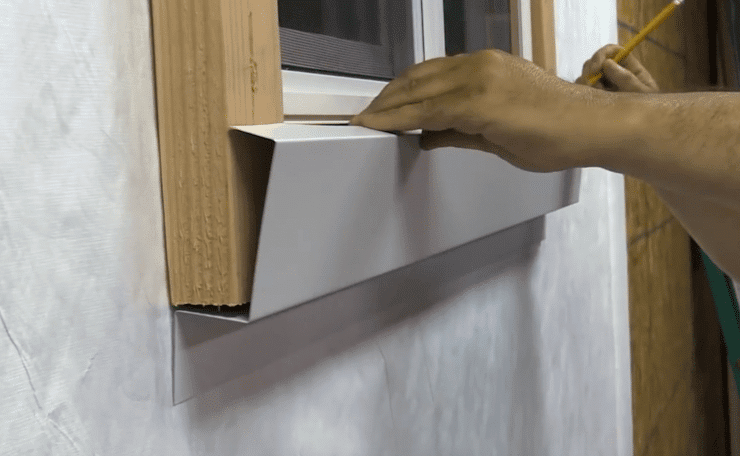
You are now ready to install the aluminum coil cap.
Step 2: Trim Windows with Coil
Measure the width and height of the 2x4 frame, then cut pieces of coil to the following lengths:
- 1 pc - 2” longer than the width of the frame top
- 2 pc - 1” longer than the height of the frame side
- 1 pc - Exact width of the frame bottom
To bend the coil, measure the inside, face, and outside of the wood frame. Use an aluminum coil brake to bend the coil to match the shape of the wood frame. Your first bend will be the inside measurement, the second bend will be the face measurement, and your third bend will be the outside measurement.
Now that you have four pieces of bent coil, you must make some cuts using snips to ensure they will fit together appropriately at the corners.
You will need notched corners on both ends of the bottom cap, as well as the tops of the side caps. Make mitered edges on the four remaining corners: the two edges on the top cap, and the two bottom edges on the side caps.
For a Notched Corner:
Start by laying the bottom cap flush against the edge of the wood frame. Mark the inside of the window, and one inch past that mark. Cut all the way to the first mark and remove the extra material, then cut to the second mark, then bend to create a tab. Repeat for the other required notched corners.
For a Mitered Corner
Lay the cap against the window frame. Mark the inside corner of the window, then draw a 45 degree angle. Leave a one inch tab at the bottom, and cut away the remaining material. Place the cap on the window, then fold the tab downward. Repeat for the other required mitered corners.
At this point, you’re ready to flash the window according to your local building codes.
Step 3: Installing J-channel
Whether you decided to build out and cap the window or not, the steps for installing j-channel around a window are the same.
Measure the width and height of the full window, then cut pieces of j-channel to the following lengths:
- 1 pc - 2” longer than the width of the frame bottom
- 2 pc - 3” longer than the height of the frame side
- 1 pc - 4” longer than the width of the frame top
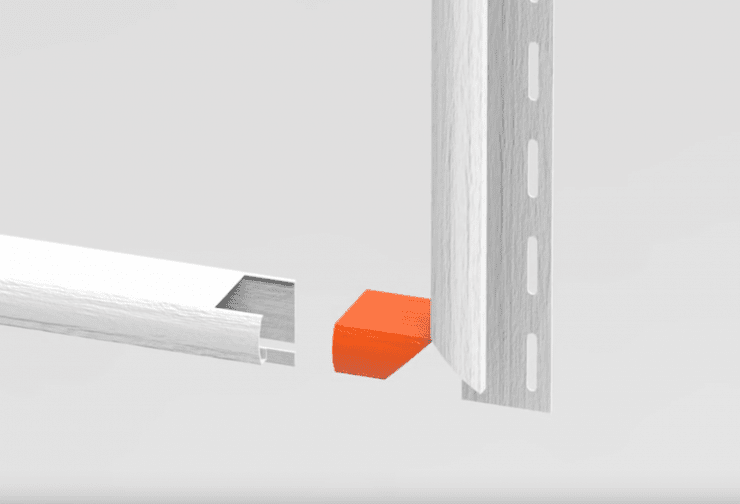
You will need to create notched corners on both ends of the bottom j-channel, and at the tops of the side j-channel. You will need mitered corners on the four remaining ends (the two edges on the top j-channel, and the two bottom edges on the side j-channels).
For notched corners, remove material equal to the width of the j-channel face. For mitered corners, mark the inside corner of the window, and cut a 45 degree angle.
Insert the tab from the mitered corner into the notched corner. Repeat this for the other side of the j-channel, then add the top piece with two mitered corners.
Finish by appropriately nailing the j-channel into place. Once the windows and doors are trimmed out, and all other accessories are installed, you’re ready to install the siding panels.

Other Related Topics


Pros Who Know:
Trimming a Window